I’m definitely in the camp of people who don’t believe in the fold in web design, and this user testing does provide evidence to support that was of thinking. Designs should still be structured so that more important information is higher on the page though.
";s:10:"bodyBlocks";a:0:{}}i:1;a:6:{s:5:"title";s:25:"Simplest jQuery Slideshow";s:4:"slug";s:25:"simplest-jquery-slideshow";s:2:"id";s:2:"92";s:10:"typeHandle";s:4:"blog";s:4:"body";s:241:"I totally agree with this thinking. Everyone loves jQuery plugins, but they can sometimes be extremely bloated for things that can be coded relatively simply.
";s:10:"bodyBlocks";a:0:{}}i:2;a:6:{s:5:"title";s:59:"Smashing Magazine Killed The Community (Or Maybe It Was Me)";s:4:"slug";s:57:"smashing-magazine-killed-the-community-or-maybe-it-was-me";s:2:"id";s:2:"93";s:10:"typeHandle";s:4:"blog";s:4:"body";s:274:"It is getting pretty tiresome reading blogs that just have lists as blog posts. Every once in a while they may be ok, but try putting some thought into your posts.
";s:10:"bodyBlocks";a:0:{}}i:3;a:6:{s:5:"title";s:53:"Freeform + FieldFrame = ExpressionEngine Form Builder";s:4:"slug";s:49:"freeform-fieldframe-expressionengine-form-builder";s:2:"id";s:2:"94";s:10:"typeHandle";s:4:"blog";s:4:"body";s:16716:"A form builder is a regular request for some clients when they are looking for a content management system. There aren’t that many CMS that have this kind of functionality built-in, and even if they do, the implementation is usually less than desirable.
If you follow along with what I’ve been up to, you can probably tell that I have been on a big ExpressionEngine kick. I’ve been using it on a ton of projects recently, and I love it for its flexibility. Although it does lack a true form builder, I figured out a simple way to build one.
If you are impatient and just want to get to the demo, go ahead. Although the form will look like nothing special, as I have just added some simple styling. The real magic of the form builder happens in the Control Panel.
This form builder would not be possible without the use of some awesome add-ons:
This one is a no-brainer. I can’t even imagine building a site without it.
If you need a form in EE, this is the way to do it.
A new fieldtype which pulls in templates and fields from the Freeform module.
I built a custom Field Group called Forms, which consisted of four fields:
The first three are pretty simple, so I will just give a quick run through on the specifications for those fields and give a more detail review of the Fields field:
This is where you select the Freeform template that will be used for the email. This field is not completely necessary, as just using the default template should be good enough, but I figured since it was an option, to throw it in.
This is where you will enter the email address(es) that you want to email when the form is submitted. Since Freeform wants multiple email addresses separated by the | character, I added some help text describing that as well.
This is where you enter the URL to the thank you page. Once a user successfully submits the form, they will be redirected here.
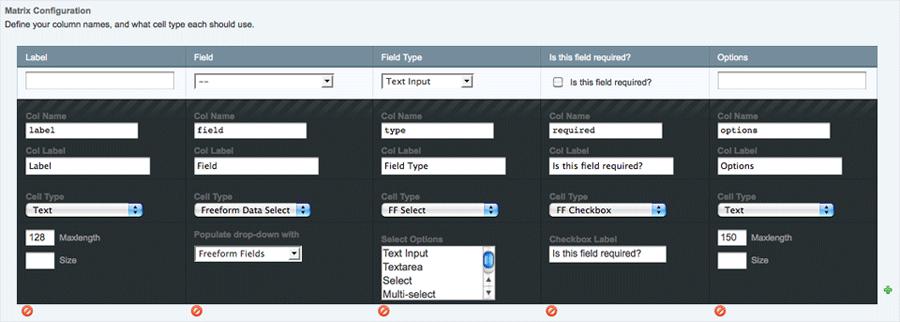
This is where the magic happens. This field is a FF Matrix field type that consists of five other fields. Each row of the FF Matrix represents one field (or field group) in the form. I’ll give a brief description of each field of the FF Matrix and show you a screenshot so you can get a better picture:
This is where you will enter the label for the form field:
This field pulls in all of the fields that have been entered into the Freeform module. So you are presented with a dropdown of all of the fields, and you just select the appropriate one:
This is where you select the type of form field you want to use. I put in a few different options, but this could be expanded upon too:
With most forms, there are some fields that are required and some that are not. If you want the field to be required, you just check the checkbox and the Freeform module will make sure it is filled in:
Finally, this field is used when you select a field type that has multiple options. For example, if you select a “Select” field type, you need to provide the options to populate it. So you enter the options separated by the | character:
So that is all you need for the Field Group, now go ahead and create a Forms Channel (or Weblog) and make sure to assign the Forms Field Group to it.
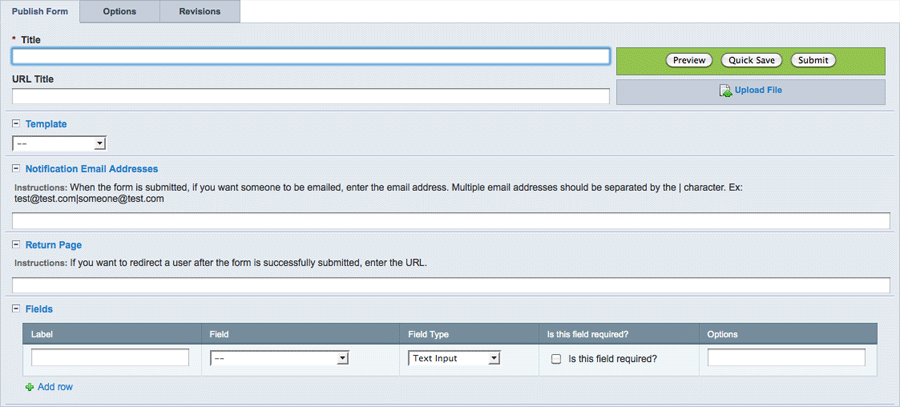
Now, when you go to publish a Forms entry, you should see something like this:
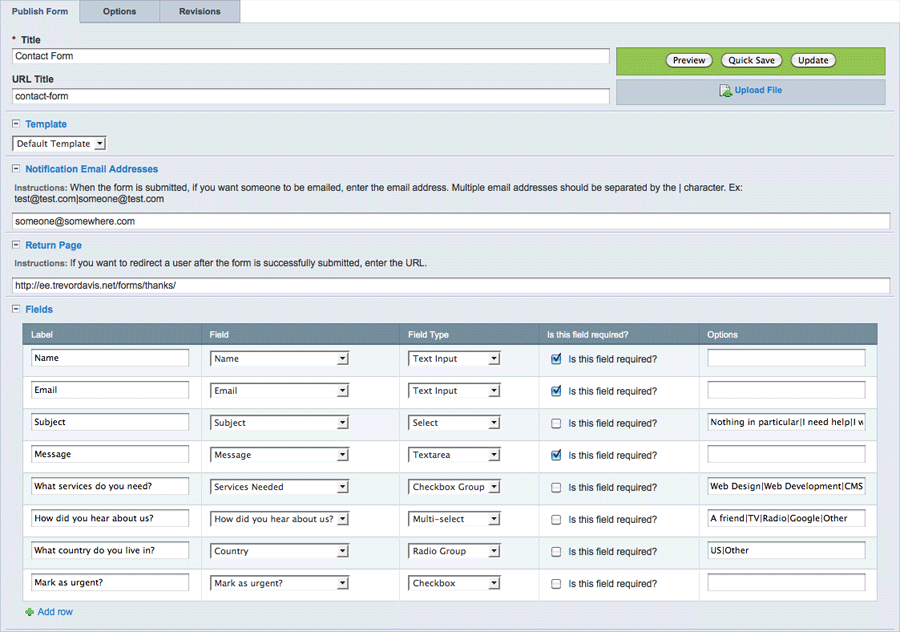
I made a demo form showing off the various types of form fields. Here is what that entry looks like in the Control Panel:
Now that we have our Channel and Field Group all setup, we need to deal with the template. You could really setup your template/template group in various ways, so I’m not going to get into those details. One detail that you need to know is that I enabled PHP for my template.
First, we just need to start with a simple exp:weblog:entries tag:
{exp:weblog:entries weblog="forms" limit="1" disable="categories|category_fields|member_data|pagination|trackbacks"}
…
{/exp:weblog:entries}
Next, we want to start the Freeform form tag:
{exp:weblog:entries weblog="forms" limit="1" disable="categories|category_fields|member_data|pagination|trackbacks"}
 {exp:freeform:form form_name="{url_title}" form_id="{url_title}" template="{form_template}" notify="{form_notify}" return="{form_return}"}
 …
 {/exp:freeform:form}
{/exp:weblog:entries}
Since we are inside of the exp:weblog:entries tag, we have access to everything that is being returned from that entry. If you have any questions about the various parameters, refer to the Freeform Documentation.
So far, the values that we are passing into the parameters are pretty straightforward, just custom fields from our entry. But, passing in the required parameter is a little more challenging, since we have to loop through all of the rows in our FF Matrix.
If we refer to the FF Matrix documentation, we can see how to loop through the rows in the matrix. I only want to return rows that have the required checkbox checked, and I want to separate the names of the fields with the | character. Then, I use the backspace parameter to remove the last one:
{exp:freeform:form form_name="{url_title}" form_id="{url_title}" template="{form_template}" notify="{form_notify}" return="{form_return}" <strong>required="{form_field search:required='y' backspace='1'}{field}|{/form_field}"</strong>}
…
{/exp:freeform:form}
Next, we want to add a title, ordered list that will contain the form fields, and the submit button:
{exp:freeform:form form_name="{url_title}" form_id="{url_title}" template="{form_template}" notify="{form_notify}" return="{form_return}" required="{form_field search:required='y' backspace='1'}{field}|{/form_field}"}
 <h1>{title}</h1>
 <ol class="forms">
  …
  <li class="buttons"><input type="submit" name="submit" value="submit" /></li>
 </ol>
{/exp:freeform:form}
Now here is where the code gets interesting. Just like we did with the required parameter, we want to loop through each row in the FF Matrix and display a list item for each one:
{form_field}
 <li>
 …
 </li>
{/form_field}
First, let’s display the label, if there is one, and denote if the field is required or not:
{if "{label}"}
 <label for="{field}">{if "{required}" == "y"}<em class="required">*</em>{/if}{label}</label>
{/if}
The rest of the code is a big conditional statement which depends upon the Field Types that you specified in the FF Matrix. Let’s first take a look at the Text Input, Textarea, and Checkbox types since they are pretty straightforward:
{if "{type}" == "Text Input"}
 <input type="text" name="{field}" id="{field}" />
{if:elseif "{type}" == "Textarea"}
 <textarea name="{field}" id="{field}"></textarea>
{if:elseif "{type}" == "Checkbox"}
 <input type="checkbox" class="checkbox" name="{field}" id="{field}" />
…
{/if}
So we are just checking the type column in the FF Matrix, and then displaying the rest of the data from the row in the appropriate form field.
Next, let’s walk through what happens if you select the Select or Multi-select types:
{if:elseif "{type}" == "Select" || "{type}" == "Multi-select" && "{options}"}
 <select name="{field}{if "{type}" == "Multi-select"}[]{/if}" id="{field}"{if "{type}" == "Multi-select"} multiple="multiple" size="4"{/if}>
  <?php $items = explode("|", '{options}'); ?>
  <?php foreach ($items as $item) { ?>
   <option value="<?php echo $item; ?>"><?php echo $item; ?></option>
  <?php } ?>
 </select>
…
{/if}
So first, we are displaying the select element, and if it is a Multi-select, we are adding [] to the name attribute, and adding the multiple and size attributes.
Next, we want to take the string of options that are separated by the | character, and create an array out of the string using the explode function.
Then, we loop through the array, and display the options for each one.
Finally, we do virtually the same thing for the Radio Group and Checkbox Group field types:
{if:elseif "{type}" == "Radio Group" && "{options}"}
 <ul class="group">
  <?php $items = explode("|", '{options}'); $count = 1; ?>
  <?php foreach ($items as $item) { ?>
   <li><input type="radio" class="radio" name="{field}" id="{field}<?php echo $count; ?>" value="<?php echo $item; ?>" />
   <label for="{field}<?php echo $count; ?>"><?php echo $item; ?></label></li>
   <?php $count++; ?>
  <?php } ?>
 </ul>
{if:elseif "{type}" == "Checkbox Group" && "{options}"}
 <ul class="group">
  <?php $items = explode("|", '{options}'); $count = 1; ?>
  <?php foreach ($items as $item) { ?>
   <li><input type="checkbox" class="checkbox" name="{field}[]" id="{field}<?php echo $count; ?>" value="<?php echo $item; ?>" />
   <label for="{field}<?php echo $count; ?>"><?php echo $item; ?></label></li>
   <?php $count++; ?>
  <?php } ?>
 </ul>
{/if}
So that’s it really. Here is the full template:
{exp:weblog:entries weblog="forms" limit="1" disable="categories|category_fields|member_data|pagination|trackbacks"}

 {exp:freeform:form form_name="{url_title}" form_id="{url_title}" template="{form_template}" notify="{form_notify}" return="{form_return}" required="{form_field search:required='y' backspace='1'}{field}|{/form_field}"}

  <h1>{title}</h1>
  <ol class="forms">
   {form_field}
    <li>
     {if "{label}"}
      <label for="{field}">{if "{required}" == "y"}<em class="required">*</em>{/if}{label}</label>
     {/if}
     {if "{type}" == "Text Input"}
      <input type="text" name="{field}" id="{field}" />
     {if:elseif "{type}" == "Textarea"}
      <textarea name="{field}" id="{field}"></textarea>
     {if:elseif "{type}" == "Checkbox"}
      <input type="checkbox" class="checkbox" name="{field}" id="{field}" />
     {if:elseif "{type}" == "Select" || "{type}" == "Multi-select" && "{options}"}
      <select name="{field}{if "{type}" == "Multi-select"}[]{/if}" id="{field}"{if "{type}" == "Multi-select"} multiple="multiple" size="4"{/if}>
       <?php $items = explode("|", '{options}'); ?>
       <?php foreach ($items as $item) { ?>
        <option value="<?php echo $item; ?>"><?php echo $item; ?></option>
       <?php } ?>
      </select>
     {if:elseif "{type}" == "Radio Group" && "{options}"}
      <ul class="group">
       <?php $items = explode("|", '{options}'); $count = 1; ?>
       <?php foreach ($items as $item) { ?>
        <li><input type="radio" class="radio" name="{field}" id="{field}<?php echo $count; ?>" value="<?php echo $item; ?>" />
        <label for="{field}<?php echo $count; ?>"><?php echo $item; ?></label></li>
        <?php $count++; ?>
       <?php } ?>
      </ul>
     {if:elseif "{type}" == "Checkbox Group" && "{options}"}
      <ul class="group">
       <?php $items = explode("|", '{options}'); $count = 1; ?>
       <?php foreach ($items as $item) { ?>
        <li><input type="checkbox" class="checkbox" name="{field}[]" id="{field}<?php echo $count; ?>" value="<?php echo $item; ?>" />
        <label for="{field}<?php echo $count; ?>"><?php echo $item; ?></label></li>
        <?php $count++; ?>
       <?php } ?>
      </ul>
     {/if}
    </li>
   {/form_field}
   <li class="buttons"><input type="submit" name="submit" value="submit" /></li>
  </ol>
 {/exp:freeform:form}
{/exp:weblog:entries}
This is not meant to be an all-inclusive form builder, as you can see there are many other parameters for the Freeform module. But, this was meant to show a creative use of ExpressionEngine and EE add-ons to add functionality that is not directly built into the CMS.
So go forth and create.
";s:10:"bodyBlocks";a:0:{}}i:4;a:6:{s:5:"title";s:33:"Reversed Ordered List with jQuery";s:4:"slug";s:28:"reversed-ordered-list-jquery";s:2:"id";s:2:"95";s:10:"typeHandle";s:4:"blog";s:4:"body";s:4303:"At work this past week, a client requested something that I wasn’t sure how to achieve: a reversed ordered list. So basically, they wanted to have a top 10 list, with the first item being numbered 10 and the last 1.
If you want to skip ahead to the demo, go ahead.
Now sure, I could have just written the numbers in as text, but it’s a list, and it’s ordered! Here is an example of what the client wanted:
10. Lorem ipsum dolor sit amet, consectetur adipiscing elit.
9. Lorem ipsum dolor sit amet, consectetur adipiscing elit.
8. Lorem ipsum dolor sit amet, consectetur adipiscing elit.
…
1. Lorem ipsum dolor sit amet, consectetur adipiscing elit.
After some digging around, I found out that you can add the value attribute to each list item to specify the number to display. So basically, I just needed to code my list like this:
<ol>
<li value="10">Lorem ipsum dolor sit amet, consectetur adipiscing elit.</li>
<li value="9">Lorem ipsum dolor sit amet, consectetur adipiscing elit.</li>
<li value="8">Lorem ipsum dolor sit amet, consectetur adipiscing elit.</li>
…
<li value="1">Lorem ipsum dolor sit amet, consectetur adipiscing elit.</li>
</ol>
Pretty straightforward, but also pretty ugly. So what happens when the client decides they want to insert another bullet in the middle of the list? Yep, that’s right, they would have to adjust the numbering for the rest of the list.
Pretty crappy, so let’s use the powerfulness of jQuery to make this a little better.
So just like before, we just want to create an ordered list, but this time, we will leave off the value attribute. We are also going to add a class to the ordered list that we will use as a hook to add in the jQuery functionality:
<ol class="reversed">
<li>Lorem ipsum dolor sit amet, consectetur adipiscing elit.</li>
<li>Lorem ipsum dolor sit amet, consectetur adipiscing elit.</li>
<li>Lorem ipsum dolor sit amet, consectetur adipiscing elit.</li>
…
<li>Lorem ipsum dolor sit amet, consectetur adipiscing elit.</li>
</ol>
Mapping out the code a bit: we want to select each element with a class of reversed, and count the total number of children list items. Then, we want to loop through the children, and update the value attribute to be the value of the total number of children minus a counter variable that we started at zero and increment each time through the loop.
That seems relatively straightforward, so I’ll just show the code that I wrote:
$(document).ready(function() {
 $('.reversed').each(function() {
  var $children = $(this).children('li');
  var totalChildren = $children.length;
  var start = 0;
  $children.each(function() {
   $(this).val(totalChildren - start);
   start++;
  });
 });
});
It looks like with HTML 5, we get a reversed attribute that accomplishes the same thing, but until it’s fully supported, this quick & easy solution seems to work.
I have been severely neglecting my blog, but for good reason. I have been teaching some intro to web development courses at CDIABU in Georgetown. Also, I will be starting a new job on December 1st. I will be joining the amazing team at Viget Labs as their new front-end developer.
";s:10:"bodyBlocks";a:0:{}}i:5;a:6:{s:5:"title";s:40:"Creativity is Not Design (Design Test 2)";s:4:"slug";s:38:"creativity-is-not-design-design-test-2";s:2:"id";s:2:"96";s:10:"typeHandle";s:4:"blog";s:4:"body";s:355:"Andy Rutledge has created a second design test to show that creativity does not necessarily mean you are an effective designer. The first test is excellent as well. I need to learn more about design principles…
";s:10:"bodyBlocks";a:0:{}}i:6;a:6:{s:5:"title";s:47:"ExpressionEngine: Embed an Embed within Itself?";s:4:"slug";s:45:"expressionengine-embed-an-embed-within-itself";s:2:"id";s:2:"97";s:10:"typeHandle";s:4:"blog";s:4:"body";s:7103:"At work this week, there was discussion on how to accomplish something in ExpressionEngine. We wanted to pull in entries that were in one category, but if there were no entries, then pull in from other categories and display that instead. We were kind of stumped as to how to do that.
I’m not sure if we were missing some easy way to do that, but we couldn’t think of a nice way to accomplish it.
I guess it will be helpful to give you some more context. We had created a Channel (our term for Weblog) for events. You could categorize the events, and they would publish in different places.
In this instance, the homepage, we wanted to pull an event from one category, but if there were none, then just display an event from another category.
This code was separated out in an embed so that we could use it in various places on the site:
{assign_variable:channel_name="{embed:channel}"}
{assign_variable:category_id="{embed:category}"}
{exp:weblog:entries weblog="{channel_name}" category="{category_id}" show_future_entries="yes" show_expired="no" limit="1" disable=“category_fields|custom_fields|member_data|pagination|trackbacksâ€}
<h2>{title}</h2>
{if events_feature_image}
<p class="rightSide"><a href="{url_title_path="{embed:template_path}"}"><img src="{events_feature_image}" alt="" /></a></p>
{/if}
{if events_summary}
{events_summary}
{/if}
<p><a href="{url_title_path="{embed:template_path}"}" class="more">Read more »</a></p>
{/exp:weblog:entries}
The code doesn’t really need to be explained; it’s not the important part of this post. So on the homepage, we had code that looked like this to pull in the event:
{embed="site/.events" channel="events" category="7" template_path="news-events/events"}
Now, what we really wanted to be able to do was to modify the exp:weblog:entries code to pull from a different category if there were no results. Something like this:
{exp:weblog:entries weblog="{channel_name}" category="{category_id}" show_future_entries="yes" show_expired="no" limit="1" disable=“category_fields|custom_fields|member_data|pagination|trackbacksâ€}
…
 {if no_results}
  Code  to pull from a different category
 {/if}
…
{/exp:weblog:entries}
But the problem was, there really was no code that we could put in there that would pull from another category since you can’t nest exp:weblog:entries tags. So that’s when I remembered that you could stick an embed file in there that could have the exp:weblog:entries tag inside of it.
Then we realized that the code we wanted to write would be exactly like the code in the embed file we were already working with.
So we did a little investigation and found out that according to the documentation (see notes section), you cannot embed an embed within itself.
That makes sense, because you could create an infinite loop. But what if we knew that it would not return an infinite loop?
So we determined that what we could do is not pass in the category on the embed statement, and that would pull back any events.
{exp:weblog:entries weblog="{channel_name}" category="{category_id}" show_future_entries="yes" show_expired="no" limit="1" disable=“category_fields|custom_fields|member_data|pagination|trackbacksâ€}
…
 {if no_results}
  {embed="site/.events" channel="events" template_path="news-events/events"}
 {/if}
…
{/exp:weblog:entries}
See how there is no category parameter this time? Here is the full modified code:
{assign_variable:channel_name="{embed:channel}"}
{assign_variable:category_id="{embed:category}"}
{exp:weblog:entries weblog="{channel_name}" category="{category_id}" show_future_entries="yes" show_expired="no" limit="1" disable=“category_fields|custom_fields|member_data|pagination|trackbacksâ€}
<h2>{title}</h2>
{if events_feature_image}
<p class="rightSide"><a href="{url_title_path="{embed:template_path}"}"><img src="{events_feature_image}" alt="" /></a></p>
{/if}
{if events_summary}
{events_summary}
{/if}
<p><a href="{url_title_path="{embed:template_path}"}" class="more">Read more »</a></p>
<strong>{if no_results}
{embed="site/.events" channel="events" template_path="news-events/events"}
{/if}</strong>
{/exp:weblog:entries}
And that worked!
But, we then realized that the same problem would occur if there were no future events in any categories. So, we still needed to go back and solve that problem by similarly passing the value for the show_expired parameter in the embed statement as well. I left that to my colleague, so I didn’t test this code, but this is my guess of how to solve that problem:
{assign_variable:channel_name="{embed:channel}"}
{assign_variable:category_id="{embed:category}"}
<strong>{assign_variable:show_expired="{embed:show_expired}"}</strong>
{exp:weblog:entries weblog="{channel_name}" category="{category_id}" show_future_entries="yes" <strong>show_expired="{show_expired}"</strong> limit="1" disable=“category_fields|custom_fields|member_data|pagination|trackbacksâ€}
<h2>{title}</h2>
{if events_feature_image}
<p class="rightSide"><a href="{url_title_path="{embed:template_path}"}"><img src="{events_feature_image}" alt="" /></a></p>
{/if}
{if events_summary}
{events_summary}
{/if}
<p><a href="{url_title_path="{embed:template_path}"}" class="more">Read more »</a></p>
{if no_results}
{embed="site/.events" channel="events" <strong>show_expired="yes"</strong> template_path="news-events/events"}
{/if}
{/exp:weblog:entries}
Was there some really easy way to do this that we completely blanked on? It seemed a little hacky, but the solution worked.
";s:10:"bodyBlocks";a:0:{}}i:7;a:6:{s:5:"title";s:7:"SEO FAQ";s:4:"slug";s:7:"seo-faq";s:2:"id";s:2:"98";s:10:"typeHandle";s:4:"blog";s:4:"body";s:133:"Derek Powazek clarifies some points from his latest post. Again, great stuff here.
";s:10:"bodyBlocks";a:0:{}}i:8;a:6:{s:5:"title";s:37:"Spammers, Evildoers, and Opportunists";s:4:"slug";s:35:"spammers-evildoers-and-opportunists";s:2:"id";s:2:"99";s:10:"typeHandle";s:4:"blog";s:4:"body";s:147:"Derek Powazek shares his opinion of SEO. I’m not going to lie; I agree with what he is saying.
";s:10:"bodyBlocks";a:0:{}}i:9;a:6:{s:5:"title";s:34:"Dear Small Businesses: Some Advice";s:4:"slug";s:33:"dear-small-businesses-some-advice";s:2:"id";s:3:"100";s:10:"typeHandle";s:4:"blog";s:4:"body";s:271:"Jonathan Longnecker has posted a well written article expressing his love and frustrations of designing websites with small businesses. Some very nice points and advice here.
";s:10:"bodyBlocks";a:0:{}}}s:5:"total";i:270;}}i:1;O:25:"yii\caching\TagDependency":3:{s:4:"tags";a:4:{i:0;s:7:"element";i:1;s:29:"element::craft\elements\Entry";i:2;s:40:"element::craft\elements\Entry::section:4";i:3;s:7:"graphql";}s:4:"data";a:4:{s:40:"CraftCMSce35088bdfe0816226cd17fd051a4803";s:21:"0.46162700 1707493692";s:40:"CraftCMS2743a789e8993267a348eee1ee7e4450";s:21:"0.34758900 1706282441";s:40:"CraftCMS2ac34726f299f7e18e449d8e536c67f8";s:21:"0.22771600 1711953912";s:40:"CraftCMS3817d4a648fcfac939af46605323feb0";s:21:"0.87777500 1713035607";}s:8:"reusable";b:0;}}